SATCHのシナリオをWebサーバーからダウンロードして使う
「SATCHのトラッキング・シナリオをSDカードからロードして使う」では、SDカードへのデータ保存は、別途アプリとかUSBで
行っていました。
アプリを2つ使うのは不便ということで、サーバーからのダイレクト・ダウンロード...ということにしてみました。
「SATCHのtestUpdateAndLoadZipを使って、トラッキングデータをサーバーから取得してみる」で使ったコードを一部流用します。
シナリオごとダウンロードして使います。
ダウンロードと完了の通知はLua側で行い、その後の処理はJava側で実行します。
例えば、http://example.com というサーバーにしておきます。
PHP言語が実行できるやつです。
Liteバージョンについてはコチラを参照
各project.dpdファイルを開いて、applicationidを「com.kddi.satch.xxxx」という感じで、共通にしておきます。
(xxxxは適当に読み替えてください)
各シナリオにFontファイルを追加。
SATCH Studio(フルバージョン)で、各シナリオを読み込み、作りこみをします。
SATCHを起動してシナリオを読み込む
2DElementを追加
File -> Add -> 2DElements -> Text2D
Name:text1
Top : 0.5
Left : 0.2
Font関連ファイルをIncludeしておきます。
default.ttf
dfusion.fontdef
mainのluascriptを開きます。
コードを加工。
以下のようなコードを追加します。
[変数]
URIはダミーです。適当に置き換えてください。
[関数]
targetDirectoryはPCの場合
C:\Documents and Settings\<ユーザー名>\Application Data\downloadZips
Androidスマホの場合は、
sdcard/ti/downloadZipsです。
targetDistantはサーバーのURLになります。
各ダウンロード用のファイル(*.zip、.update.xml)は別々のフォルダーに入ります。
mdl_AAA/Scenario_AAA.zip、.update.xml
mdl_BBB/Scenario_AAA.zip、.update.xml
mdl_CCC/Scenario_AAA.zip、.update.xml
...etcc
これらのファイルとフォルダーは、.update.xml作成時に生成されます。
ダウンロードが終了すると、Java側に通知するという段取りになります。
[追加]
Java側からの通知で、対象ファイルの名前でダウンロード関数をキックします。
Exportして、それぞれ共通のアプリケーションIDで署名ファイルを取得・更新しておきます。
Exportするフォルダー名は、それぞれ異なったものにします。
例
Scenario_AAA
Scenario_BBB
Scenario_CCC
...etc
各フォルダーをZIPアーカイブします。
適当なところに作業フォルダーを作って、ツールをコピーしておきます。
PrepareFolderForUpdate.exe
例:C:\Work
C:\Workに適当なフォルダーを作成。
例:C:\Work\scenario
ここに各ZIPを置いて、.update.xmlを作成します。
「SATCHのtestUpdateAndLoadZipを使って、トラッキングデータをサーバーから取得してみる」では署名ファイル作成のための工程が入ってましたが、 ここでは、.update.xmlを作成するだけです。
例:
DOS窓を開いて、
>cd C:\Work
>PrepareFolderForUpdate.exe -i scenario -o mdl_AAA
>PrepareFolderForUpdate.exe -i scenario -o mdl_BBB
>PrepareFolderForUpdate.exe -i scenario -o mdl_CCC
...etc
サーバーのドキュメントルートにdownloadzipsというディレクトリを作って、ここにフォルダー(mdl_AAA,mdl_BBB,mdl_CCC.....)ごと アップロードしておきます。
Javaでは、Luaからダウンロード終了の通知を受けて、ZIPを解凍し、オリジナルZIPを削除します。
現バージョンでは、解凍後、再度メニュをタップすることでシナリオをロードして実行します。
Java側で必要なコードのみ記述しておきます。
Luaとのインターフェース
TOP
インストール

アプリをQRコードからインストールする方法はコチラを参照
TOP
トップページ| サイトマップ|
アプリを2つ使うのは不便ということで、サーバーからのダイレクト・ダウンロード...ということにしてみました。
「SATCHのtestUpdateAndLoadZipを使って、トラッキングデータをサーバーから取得してみる」で使ったコードを一部流用します。
シナリオごとダウンロードして使います。
ダウンロードと完了の通知はLua側で行い、その後の処理はJava側で実行します。
リンク
フェルメールの作品のトラッキングデータをダウンロード
SATCHのトラッキング・シナリオをSDカードからロードして使う
SATCHのtestUpdateAndLoadZipを使って、トラッキングデータをサーバーから取得してみる
TOP
やり方
【ダウンロード用サーバー】
サーバーが必要なので、別途準備が必要です。例えば、http://example.com というサーバーにしておきます。
PHP言語が実行できるやつです。
【SATCH側】
SATCH Studio Liteで、同じトラッキング対象・同じアプリケーションIDで異なる3Dオブジェクトを表示するための複数のシナリオを、事前に作成しておきます。Liteバージョンについてはコチラを参照
各project.dpdファイルを開いて、applicationidを「com.kddi.satch.xxxx」という感じで、共通にしておきます。
(xxxxは適当に読み替えてください)
各シナリオにFontファイルを追加。
SATCH Studio(フルバージョン)で、各シナリオを読み込み、作りこみをします。
SATCHを起動してシナリオを読み込む
2DElementを追加
File -> Add -> 2DElements -> Text2D
Name:text1
Top : 0.5
Left : 0.2
Font関連ファイルをIncludeしておきます。
default.ttf
dfusion.fontdef
mainのluascriptを開きます。
コードを加工。
以下のようなコードを追加します。
[変数]
URIはダミーです。適当に置き換えてください。
    --add
	local scene = getCurrentScene();
	local text1 = Text2D(scene:getObjectByName("text1"))
	URI = "http://example.com"
[関数]
targetDirectoryはPCの場合
C:\Documents and Settings\<ユーザー名>\Application Data\downloadZips
Androidスマホの場合は、
sdcard/ti/downloadZipsです。
targetDistantはサーバーのURLになります。
各ダウンロード用のファイル(*.zip、.update.xml)は別々のフォルダーに入ります。
mdl_AAA/Scenario_AAA.zip、.update.xml
mdl_BBB/Scenario_AAA.zip、.update.xml
mdl_CCC/Scenario_AAA.zip、.update.xml
...etcc
これらのファイルとフォルダーは、.update.xml作成時に生成されます。
ダウンロードが終了すると、Java側に通知するという段取りになります。
    --add
	function download_zip(zipname)
    --
    local targetcount = -1
    local targetstatus = -1
    local ltime = Timer()
    local targetDirectory = ""
    targetDirectory = getUserAppDataDirectory() .. "downloadZips/"


    local msg = ""
    local failed = false
    if ("<your address here>" == URI) then -- note that the URI is defined in another .lua file and has to be customized to let it work
        msg = "DEBUG message:\nYou need to customize the distant URI\nPlease modify this sample for your use, then recompile"
        text1:setText(msg); LOG(msg);
        failed = true
    else -- user has customizeed the URI, can download
        msg = "Starting download..."
        text1:setText(msg); LOG(msg);

        local targetDistant = URI .. "/downloadzips/mdl_" .. zipname .. "/"

        local id = startRemoteUpdate( targetDistant, targetDirectory )
        if ( id > 0 ) then
            msg = "Download started, in progress..."
            text1:setText(msg); LOG(msg);
            local finish = false
            repeat
                status = getRemoteUpdateStatus( id )
                if status==TI_DLFINISHED then
                    msg = "Download finsihed successfully"
                    text1:setText(msg); LOG(msg);
                    finish = true

                    ltime:start()
                    repeat
                        --
                        coroutine.yield()
                    until ltime:getTime() > 3
                    text1:setText("")

                    componentInterface:executeAppFunc("dlstatus","finished")

                elseif status==TI_DLFAILED or status==TI_CANCELED then
                    msg = "Error: Download failed."
                    text1:setText(msg); LOG(msg);
                    finish = true
                    failed = true
                else
                    coroutine.yield()
                end
            until finish
        else
            msg = "Error : Failed to start download."
            text1:setText(msg); LOG(msg);
            failed = true
        end
    end
end
[追加]
Java側からの通知で、対象ファイルの名前でダウンロード関数をキックします。
isCommand, command = componentInterface:pullCommand()
    if isCommand then

        --add
        if command["CommandName"] == "dlzip" then
            local zipname = command["arg0"]
            download_zip(zipname)
        else
            handleCommand(command)
        end
    end
Exportして、それぞれ共通のアプリケーションIDで署名ファイルを取得・更新しておきます。
Exportするフォルダー名は、それぞれ異なったものにします。
例
Scenario_AAA
Scenario_BBB
Scenario_CCC
...etc
各フォルダーをZIPアーカイブします。
適当なところに作業フォルダーを作って、ツールをコピーしておきます。
PrepareFolderForUpdate.exe
例:C:\Work
C:\Workに適当なフォルダーを作成。
例:C:\Work\scenario
ここに各ZIPを置いて、.update.xmlを作成します。
「SATCHのtestUpdateAndLoadZipを使って、トラッキングデータをサーバーから取得してみる」では署名ファイル作成のための工程が入ってましたが、 ここでは、.update.xmlを作成するだけです。
例:
DOS窓を開いて、
>cd C:\Work
>PrepareFolderForUpdate.exe -i scenario -o mdl_AAA
>PrepareFolderForUpdate.exe -i scenario -o mdl_BBB
>PrepareFolderForUpdate.exe -i scenario -o mdl_CCC
...etc
サーバーのドキュメントルートにdownloadzipsというディレクトリを作って、ここにフォルダー(mdl_AAA,mdl_BBB,mdl_CCC.....)ごと アップロードしておきます。
【Eclipse側】
Javaでは、Luaからダウンロード終了の通知を受けて、ZIPを解凍し、オリジナルZIPを削除します。
現バージョンでは、解凍後、再度メニュをタップすることでシナリオをロードして実行します。
Java側で必要なコードのみ記述しておきます。
Luaとのインターフェース
public void postInitComponent(){
    // override this if you need to do some special handling on the component after standard initialization
    if (_isInitializedCorrectly) {
        _kddiComponent.activateAutoFocusOnDownEvent(true);
        _kddiComponent.registerCommunicationCallback("dlstatus", this, "dlstatus");

    }
}

public void dlstatus(String[] arrayOfString) {
    //

    if (arrayOfString[0].equals("finished")) {
        boolean res = download_exist();
        if (res == true) {
            String download_path = Environment.getExternalStorageDirectory().getAbsolutePath() + "/ti/downloadZips/" + "Scenario_" + target_name + ".zip";
                String distination_path = Environment.getExternalStorageDirectory().getAbsolutePath() + "/ti/downloadZips/" + "Scenario_" + target_name;

                extract(download_path,distination_path);
        }

    }
}
ZIPファイルが存在するかどうかチェック
private boolean download_exist(){
    String download_path = Environment.getExternalStorageDirectory().getAbsolutePath() + "/" + "ti/downloadZips";
    Log.i("DIR",download_path);
    File scenario_dir = new File(download_path);
    String tempname = "";
    String z_name = "Scenario_" + target_name + ".zip" ;//ここは適当に変えてください。

    //ファイル名のリストを作成
    final File[] files = scenario_dir.listFiles();

    for (int i = 0; i < files.length; i++) {
        File file = files[i];
        tempname = file.getName();
        Log.i("FILE",tempname + "/" + z_name);

        if (z_name.equals(tempname)){
            return true;
        }
    }
    return false;

}
解凍されたファイルが存在するかどうかチェック
public boolean scenario_exist(String target){
    String scenario_path = Environment.getExternalStorageDirectory().getAbsolutePath() + "/ti/downloadZips";
    File scenario_dir = new File(scenario_path);
    String tempname = "";
    String s_name = "Scenario_" + target;//ここは適当に変えてください。

    //ファイル名のリストを作成
    final File[] files = scenario_dir.listFiles();

    for (int i = 0; i < files.length; i++) {
        File file = files[i];
        tempname = file.getName();

        if (s_name.equals(tempname)){
            return true;
        }
    }
    return false;

}
ZIPファイルを解凍する(例)
public void extract(String filename,String folderpath) {
    //この部分は、開発の固有性に強く影響される部分です
    //ここで使っている関数はZIPの階層構造を再現できないので
    //事前に元の階層構造を作っておく必要があります。
    //親フォルダーを作ってから子フォルダーをつくるという手順です
    //例:
    File distparent_dir1 = new File(folderpath);
    distparent_dir1.mkdir();
    File distchld_dir2 = new File(folderpath + "/media");
    distchld_dir2.mkdir();
    File distchld_dir3 = new File(folderpath + "/media/model");

    //解凍を開始
    ZipInputStream in = null;
    BufferedOutputStream out = null;
    ZipEntry zipEntry = null;
    int len = 0;

    String f_name = "";

    try {
        in = new ZipInputStream(new FileInputStream(filename));
        // ZIPファイルに含まれるエントリに対して順にアクセス
        while ((zipEntry = in.getNextEntry()) != null) {
            File newfile = new File(zipEntry.getName());

            // 出力用ファイルストリームの生成
            f_name = newfile.getName();

            例:ファイルの拡張子を見て、コピー先を判断しています
            String[] str1Ary = f_name.split("\\.");

            int count = str1Ary.length;
            if (str1Ary[count - 1].equals("jpg")){

                out = new BufferedOutputStream(new FileOutputStream(folderpath + "/media/model/" + newfile.getName()));

            }


            // エントリの内容を出力
            byte[] buffer = new byte[1024];
            while ((len = in.read(buffer)) != -1) {
                out.write(buffer, 0, len);
            }

            in.closeEntry();
            out.close();
            out = null;


        }
        //
        File download_file = new File(filename);

        //元のZIPファイルを削除
        download_file.delete();


    } catch (IOException e) {
        e.printStackTrace();
    }


}
対象ファイルをSDカードからロードする
public void loadScenario_II(){
    //一度登録されたコールバック関数を解除しておく
    cancelReservePlayScenario();
    //
    String SDFile = android.os.Environment.getExternalStorageDirectory().getPath();
    String dpdfile = SDFile + "/ti/downloadZips/Scenario_" + target_name + "/project.dpd";//ここは適当に変えてください。
    Log.w("FILENAME",dpdfile);
    _kddiComponent.loadScenario(dpdfile);

}

private void cancelReservePlayScenario(){
    if (handler != null && runnable != null){
        handler.removeCallbacks(runnable);
        runnable = null;
    }
}
終了時などに登録されたコールバック関数を解除しておく
@Override
public void onResume(){
    super.onResume();
    if (_isInitializedCorrectly) {
        // GL context is recreated and media is reloaded.
        _kddiComponent.onResume();
        reservePlayScenario();

    }else{
        //add
        cancelReservePlayScenario();
    }


}


@Override
public void onPause() {
    // When the activity is paused the GL context is destroyed, so all media is unloaded.
    //add
    cancelReservePlayScenario();
}


@Override
public void onStop() {
    //add
    cancelReservePlayScenario();

    super.onStop();
}


@Override
public void onDestroy() {
    //add
        cancelReservePlayScenario();
}
TOP
アプリケーション
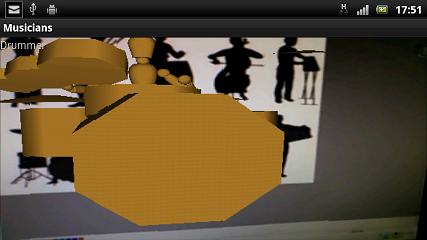
このアプリは、トラッキング画像を認識して7体のモデルを表示します。
こんな感じ。
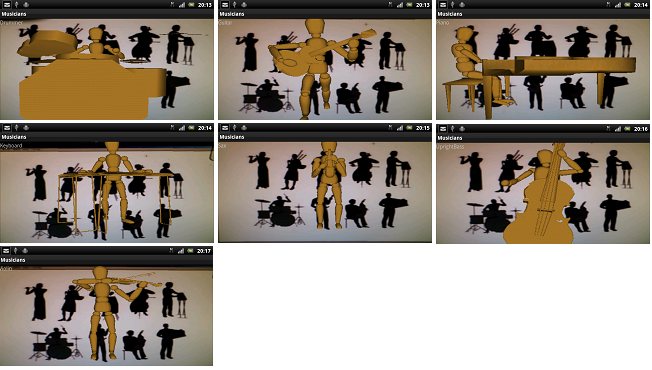
アプリが持つシナリオは最初の「Drummer」のみで、他のシナリオはダウンロードして使います。
トラッキング画像はこんな感じ。

起動時認識。
他のmusicianを選ぶ場合は、メニュキー をクリックしてメニュを出します。
例えば「Sax」を選んでみます。
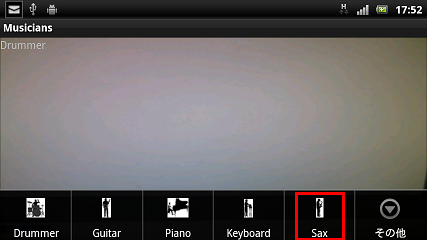
既にダウンロードされていた場合、Loading...が開始されます。

まだダウンロードされていない場合は、ダウンロードが始まります。

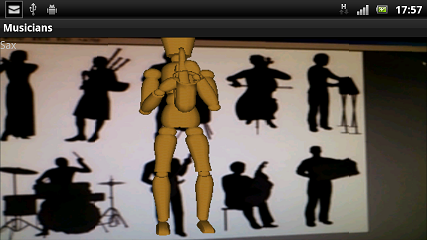
ダウンロードが終了し、メッセージが消えたら、再度メニュを開いて「Sax」をタップしてください。
シナリオがロードされます。

Saxを認識。
インストール
アプリをQRコードからインストールする方法はコチラを参照
TOP
トップページ| サイトマップ|