SATCHで1000円札を検出するAR
SATCHサンプルコードの使いまわしです。
でも、サンプルのままだと、月面の画像なんでどこにでもあるってわけにいかない。
で、1000円札にしてみました。
1000円札の上でロボットが踊るってのもなんなんで、リングを表示するようにしてみました。
目次
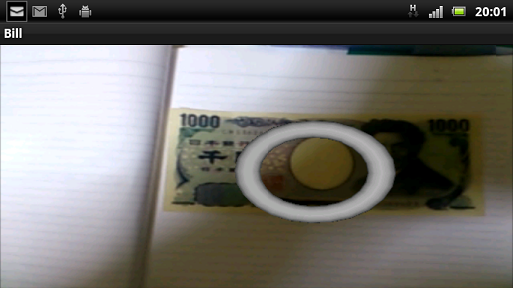
こんな感じ。

前処理
リアルカメラの初期設定
バーチャルカメラの設定
3Dオブジェクトを追加
トラッキング・シナリオを作って、3Dオブジェクトをトラッカーに配置
コンテンツをエクスポートしてシナリオファイル作成
シナリオを使ってアプリ作成
New
AR Viewer Library for Android (satch_Android_jp.zip)が更新されました。
最新版の更新はこちらから
(ユーザー登録が必要です)
TOP
前処理
サンプル素材をダウンロードして解凍しておきます。
SATCHを起動して、プロジェクトを作成(Bill)。
プロジェクトフォルダーに素材から以下をコピー。
Material/
●ti_torusフォルダー(D'FusionのMedia Libraryのもの)
●trackerフォルダー
●tracking.lua
TOP
リアルカメラの初期設定
開発用のWebカメラを設定しておきます。
ビデオキャプチャー・オブジェクトをシナリオに追加
メニューバー --> Add --> 2D Elements --> Videocapture
Name --> videocapture_live
Resource file --> trackerフォルダ内のvideoConfig_webcam_640x480_15fps.xml --> OK
ビデオキャプチャーの設定
Outlinerのvideocapture_liveを右クリック --> Edit Properties
Object editorのAlternative platformにチェック
Platform alternative resource file
android --> trackerフォルダ内のvideoConfig_android_backcam_320x240_15fps.xml
Set initial valuesボタンをクリック
テクスチャーにビデオキャプチャーを適用して、シーンに追加
メニューバー --> Add --> 2D Elements --> Videotexture
Name --> videotexture_live --> OK
Outliner --> videotexture_liveを選択
Object editor --> Video Textureの枠内
Video capture --> videocapture_live
Set initial valuesボタンをクリック
ビデオ・テクスチャーをViewportに適用
Object Editor --> viewportを選択
Background Textureパラメータ --> videotexture_liveに変更
Set initial valuesボタンをクリック
シナリオを保存し、テスト
メニューバー --> File --> Save
 Playボタンをクリック
次に作業のために、 Resetボタンをクリック
TOP
バーチャルカメラの設定
リアルカメラに対応するように、バーチャルカメラのパラメータを定義
Object editor --> camera
Camera parameters枠内
Calibration file --> tracker内のcameraCalib_webcam_640x480.xml
Alternative platformにチェック
Platform alternative resource file
android --> trackerフォルダ内のcameraCalib_android_320x240.xml
Set initial valuesボタンをクリック
Camera parameters枠内
Calibrateボタンをクリックして確認
パネルタブの左上にある"X"ボタンをクリックし、Camera Calibrationパネルを閉じる
Studioタブを選択
File --> Save
TOP
3Dオブジェクトを追加
シナリオに3Dオブジェクトを追加
Solution Explorer --> ti_torusを開く
ti_torus.sceneを3Dビューへドラッグ&ドロップ
3Dオブジェクトの位置を調整し、確認
Outliner --> ti_torusオブジェクトを選択
Object editor --> Position枠内のLocalZ座標 --> -3.00
Set initial valuesボタンをクリック
File --> Save
シナリオにライトを追加
メニューバー --> Add --> Effect --> Light
Name --> light1 --> OK
3Dオブジェクトを3Dビューアで確認
Outliner --> ti_torusを右クリック --> Open in 3D Viewer
Animationを選択 --> プルダウンメニュ内でtimelineを選択 --> Playボタンをクリック
パネルの左上の"X"ボタンをクリックして、3D Viewerタブを閉じる
Studioタブを選択
シナリオにスクリプトを追加
メニューバー --> Add --> Script
Name --> torus_manager
Owner --> ti_torus
Resource file --> torus_manager.luaという名前の空ファイルを作る
Outliner --> torus_managerを右クリック --> Open in Lua Editor
以下のコードをコピー&ペースト
local torus = Scenette(getCurrentScriptOwner())
コードの最後は改行で終わってください
File --> Save
Studioタブを選択
シナリオをテスト
Resetボタンをクリック
Playボタンをクリック
テスト(オブジェクトにテクスチャがあれば、表示されます)が終わったら、
Resetボタンをクリック
TOP
トラッキング・シナリオを作って、3Dオブジェクトをトラッカーに配置
トラッキング・シナリオを作成
1000円札を用意
メニューバー --> Tools --> Computer Vision
mode --> Lite
Userlevel --> Advanced
Scenario Mangerタブ
Createボタンをクリック
Target TypeがPlaneになっていることを確認
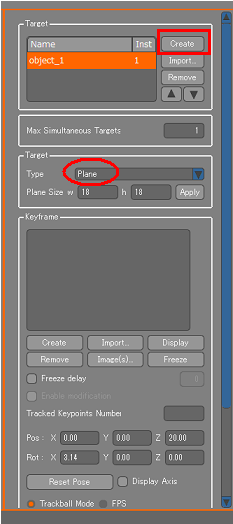
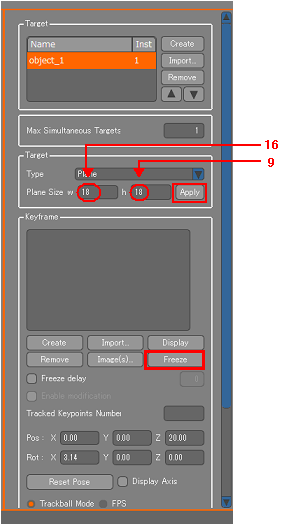
Target枠内のPlane Size
1000円札の場合は、w=16、h=9
Applyボタンをクリック
カメラにお札を映し、全体が映ったところで、Freezeボタンをクリック
マウスを使い、赤い面がお札のイメージに重なるように調整します
拡大・縮小:マウス中央ボタンを押しながらドラッグ(前進:縮小、後進:拡大)
移動:右クリック+ドラッグ
回転:左クリック+ドラッグ
重なったところで、Createボタンをクリック
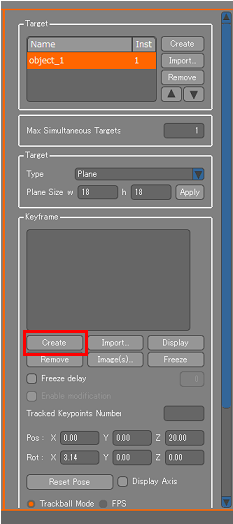
Genetate Classifiersをクリック --> OK
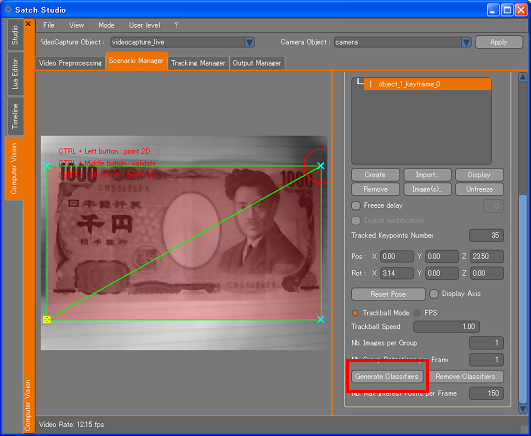
クラシファイルズの生成が開始されます(完了まで、結構時間がかかります)。
完了後、Tracking Managerタブに切り替え、ウェブカメラに画像を写し、正常にトラッキングするか確認
メニューバー --> File --> Save asを選択
trackerフォルダに保存(tracker.xml)
Luaスクリプトをオブジェクトとしてシナリオに追加
左横のStudioタブを選択
Solution Explorer --> tracking.luaを選択
3Dビューへドラッグ&ドロップ
Outliner --> luascriptを選択
Object Editor --> Edit Object Nameをクリック
「tracking」に名称変更
Set initial valuesボタンをクリック
トラッキング・データ取得用に空の3Dオブジェクトを追加
メニューバー --> Add --> 3D Elements --> Empty 3D object
Name --> Tracking_Object
Hierachy Managerでti_torusを、Tracking_Objectへドラッグ&ドロップ
ti_torusが選択された状態 --> Object editor --> Set initial valuesボタンをクリック
File --> Save
3Dオブジェクトをトラッキング画像に調整
Playボタンをクリック
画像をカメラに写しトラッキング
3Dオブジェクトは非常に大きく、向きも正しくないので、サイズ・向き・位置の調整を行う
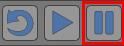 Pauseボタンをクリック
Object editor --> ti_torusオブジェクトを選択
Position = 0, 0, 0
Orientation = 90, 0, 0
Scale = 0.07, 0.07, 0.07
Set initial valuesボタンをクリック
Playボタンをクリック
File --> Save
![]()
TOP
コンテンツをエクスポートしてシナリオファイル作成
アプリ作成用に、シナリオを作る
Playの状態なら、 Pauseボタンをクリック
All Platformのプルダウンメニュを開く
androidを選択
Solution explorer内の、赤いアイコン が表示されているフォルダとファイルを選択
選択したフォルダ・ファイル上で右クリック、Include in export listを選択
赤いアイコンがなくなるまで繰り返す
あらかじめ、デスクトップ等にエクスポート用のフォルダ(Scenario_a)を作成
メニューバー --> Project --> Export
target --> mobile
Platform --> android
Application ID --> com.kddi.satch.bill
Export folder --> エクスポート用のフォルダ(Scenario_a)
Exportをクリック
TOP
シナリオを使ってアプリ作成
(1)Eclipseを起動して、プロジェクトを新規に作成
File -> New -> Other
Android -> Android Project
プロジェクト名は「Bill」。
Project Name -> Bill
Build Target -> Android 2.3.3
Package Name -> com.kddi.satch.bill
プロジェクトの"assets"フォルダにScenarioフォルダーを作成、その中に作成済みのScenario_aフォルダーをコピー。
前にダウンロードした、AR Viewer Library for Android (satch_Android_jp.zip)を解凍。
プロジェクトに"libs"フォルダを作成し、satch.jarをコピー。
"libs"フォルダ内に"armeabi"フォルダを作成し、libsatchAnrdoid.soとlibtiAndroidAR2.soをコピー。
resフォルダーにdrawableフォルダーを作ってアイコンを作成
プロジェクトをRefresh。
satch.jarを右クリックしてビルドパスを通します。
Build Path -> Add to Build Path
(2)AndroidManifest.xmlを編集
<Activityに以下を追加
	android:screenOrientation="landscape"
android:configChanges="orientation|keyboard|keyboardHidden"


</application>の下に以下を追加

<!-- 画像解像度を設定します -->
<supports-screens
    android:anyDensity="false"
    android:normalScreens="true"
    android:largeScreens="true"
    android:smallScreens="true"
    android:resizeable="true">
</supports-screens>

<!-- カメラ機能、ライセンス認証で利用するパーミッションを許可します -->
<uses-permission android:name="android.permission.CAMERA" />
<uses-permission android:name="android.permission.WAKE_LOCK" />
<uses-permission android:name="android.permission.WRITE_EXTERNAL_STORAGE" />
<uses-permission android:name="android.permission.ACCESS_COARSE_LOCATION" />
<uses-permission android:name="android.permission.INTERNET" />
<uses-permission android:name="android.permission.ACCESS_NETWORK_STATE" />
<uses-permission android:name="android.permission.ACCESS_WIFI_STATE" />

<!-- オートフォーカスを設定します -->
<uses-feature android:name="android.hardware.camera" />
<uses-feature android:name="android.hardware.camera.autofocus" />
<uses-sdk android:minSdkVersion="7" />
(3)プロジェクトにパッケージを追加
File -> New -> Package
Name -> com.kddi.satch.billactivity
このパッケージに、抽象クラスを作成。
com.kddi.satch.billactivityを選んで、
File -> New -> Class
Name ->BillActivity_simple
Modifiers -> Public/abstract
コードは以下の通り。
【BillActivity_simple.java】
package com.kddi.satch.billactivity;

import android.app.Activity;
import android.app.AlertDialog;
import android.app.Dialog;
import android.content.DialogInterface;
import android.content.pm.ApplicationInfo;
import android.content.pm.PackageManager;
import android.content.pm.PackageManager.NameNotFoundException;
import android.os.Bundle;
import android.os.Handler;
import android.view.KeyEvent;
import android.view.View;
import android.widget.FrameLayout;

import com.kddi.satch.LoadScenarioStatus;
import com.kddi.satch.ARViewer;

public abstract class BillActivity_simple extends Activity {
    protected abstract String getSampleScenarioName();
    protected abstract String getSampleLogTag();
    protected boolean _isInitializedCorrectly;
    protected ARViewer _kddiComponent;
    protected FrameLayout _frameLayout;

    public void resetMembers(){
        _isInitializedCorrectly = false;
        _frameLayout = null;
        _kddiComponent = null;
    }
    private static final int DIALOG_EXIT = 0;

    public void initComponent(){
        _isInitializedCorrectly = false;
        _kddiComponent = new ARViewer(this);
        // This FrameLayout must be empty (but initialized) when you pass it to the kddiComponent.initialize() method.
        _frameLayout = new FrameLayout(this);
        _kddiComponent.initialize(_frameLayout);
        _isInitializedCorrectly = true;
    }

    @Override
    public void onCreate(Bundle savedInstanceState) {
        super.onCreate(savedInstanceState);
        // Add null to AR Viewer Library compornent's reference.
        resetMembers();
    }

    @Override
    public void onRestart() {
        super.onRestart();
    }

    @Override
    public void onStart() {
        super.onStart();
        // Create AR Viewer Library compornent.
        initComponent();
        postInitComponent();
        initContentView();
        if (_isInitializedCorrectly) {
            // Do authorize and madia is loaded.
            // You must call loadScenario() method.
            loadScenario();
        }
    }

    @Override
    public void onResume(){
        super.onResume();
        if (_isInitializedCorrectly) {
            // GL context is recreated and media is reloaded.
            _kddiComponent.onResume();
            reservePlayScenario();
        }
    }

    @Override
    public void onPause() {
        // When the activity is paused the GL context is destroyed, so all media is unloaded.
        if (_isInitializedCorrectly) {
            cancelReservePlayScenario();
        if (_kddiComponent.checkLoadScenarioStatus() == LoadScenarioStatus.COMPLETE) {
            _kddiComponent.pauseScenario();
        }
            _kddiComponent.onPause();
        }
        super.onPause();
    }

    @Override
    public void onStop() {
        releaseContentView();
        // Destroy AR Viewer Library Objects.
        if (_isInitializedCorrectly){
            _kddiComponent.terminate();
            _kddiComponent = null;
            _frameLayout = null;
        }
        super.onStop();
    }

    @Override
    public void onDestroy() {
        // Destroy AR Viewer Library Objects.
        if (_isInitializedCorrectly){
            _frameLayout = null;
            _kddiComponent = null;
        }
        super.onDestroy();
        resetMembers(); // forced clean
    }

    @Override
    public boolean onKeyDown(int keyCode, KeyEvent msg){
        switch(keyCode){
            case android.view.KeyEvent.KEYCODE_BACK :
            showDialog( DIALOG_EXIT );
            return true;
        }
        return false;
    }

    public void postInitComponent(){
        // override this if you need to do some special handling on the component after standard initialization
        if (_isInitializedCorrectly) {
            _kddiComponent.activateAutoFocusOnDownEvent(true);
        }
    }

    public void initContentView(){
        // override this if you need to do some special handling on the component after standard initialization
        if (_isInitializedCorrectly) {
            // you'll probably use some other UI object as the content view that itself will embed the component's frame layout -- here you can change all this
            // by default, the frame layout containing DFusion will be the activity content view
            setContentView(_frameLayout);
        }
    }

    public void releaseContentView(){
        // override this if you need to do some special handling on the component after standard initialization
        if (_isInitializedCorrectly) {
            // do here the release of the your UI instances (if customized)
        }
    }

    public void loadScenario(){
        ApplicationInfo appInfo = null;
        PackageManager packMgmr = getApplicationContext().getPackageManager();
        try {
            appInfo = packMgmr.getApplicationInfo(getPackageName(), 0);
        } catch (NameNotFoundException e) {
            e.printStackTrace();
            throw new RuntimeException("Unable to locate assets, aborting...");
        }
        String dpdfile = appInfo.sourceDir + getSampleScenarioName();
        _kddiComponent.loadScenario(dpdfile);
    }

    // Set polling rate for loading the media.
    private final int REPEAT_INTERVAL = 100;
    private Handler handler = new Handler();
    private Runnable runnable = null;


    //
    private void reservePlayScenario(){
        if (runnable == null){
            runnable = new Runnable(){
                @Override
                public void run(){
                    LoadScenarioStatus status = _kddiComponent.checkLoadScenarioStatus();
                    if (status == LoadScenarioStatus.CANCEL){
                        // cancel(appli suspend)
                    }else if (status == LoadScenarioStatus.COMPLETE){
                        // Ready to play scenario
                        _frameLayout.setVisibility(View.VISIBLE);
                        _kddiComponent.playScenario();
                    }else if (
                        status == LoadScenarioStatus.ERROR_NETWORK_UNUSABLE ||
                        // faild to load a media becase of no network connection.
                        status == LoadScenarioStatus.ERROR_NETWORK ||
                        // faild to load a media becase of network error.
                        status == LoadScenarioStatus.ERROR_SOFTWAREKEY ||
                        // faild to load a media becase software key has not be found on server.
                        status == LoadScenarioStatus.ERROR_CONTENT_STOPPED ||
                        // faild to load a media becase content has stopped.
                        status == LoadScenarioStatus.ERROR_SERVER ||
                        // faild to load a media becase of server error.
                        status == LoadScenarioStatus.ERROR_ETC
                        // faild to load a media becase of another error.
                        ){
                    // error
                    }else{
                        handler.postDelayed(this, REPEAT_INTERVAL);
                    }
                }
            };
            handler.postDelayed(runnable, REPEAT_INTERVAL);
        }
    }

    //

    private void cancelReservePlayScenario(){
        if (handler != null && runnable != null){
            handler.removeCallbacks(runnable);
            runnable = null;
        }
    }

    protected Dialog onCreateDialog(int id) {
        Dialog dialog;
        switch(id) {
            case DIALOG_EXIT:
            {
                AlertDialog.Builder builder = new AlertDialog.Builder(this);
                builder.setMessage(
                    "Really want to quit the sample?"
                )
                .setCancelable(true)
                .setPositiveButton("Yes", new DialogInterface.OnClickListener() {
                    public void onClick(DialogInterface dialog, int id) {
                        finish();
                    }})
                    .setNegativeButton("No", new DialogInterface.OnClickListener() {
                        public void onClick(DialogInterface dialog, int id) {
                            dialog.cancel();
                        }});
                    dialog = builder.create();
                    break;
            }
            default:
            dialog = null;
        }
        return dialog;
    }


}
既存のBillActivity.javaを上の抽象クラスを継承するコードに書き換えます。
【BillActivity.java】
package com.kddi.satch.bill;


import com.kddi.satch.billactivity.BillActivity_simple;

public class BillActivity extends BillActivity_simple{
    private static final String THIS_CLASS_SHORT_NAME = BillActivity.class.getName().replace("com.kddi.satch.bill.", "");
    private static final String THIS_LOGTAG  = THIS_CLASS_SHORT_NAME;
    // Set AR scenario file path.
    private static final String SCENARIO_NAME = "/assets/Scenario/Scenario_a/Bill.dpd";
    protected String getSampleScenarioName() { return SCENARIO_NAME; }
    protected String getSampleLogTag() { return THIS_LOGTAG;   }

    @Override
    public void postInitComponent(){
        super.postInitComponent();
    }

}
(4)アプリを登録する
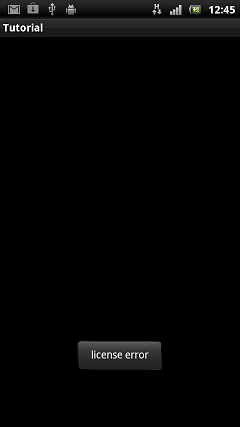
コーディングは以上ですが、このままでは動きません。
実機で動かそうとすると以下のようなライセンス・エラーになります。
SATCH Developer siteのマイページに移動。
New(2012/09/19)
レギュレーションが変わりましたので修正しておきます。
新規の場合、アプリ追加ボタンをクリックします。
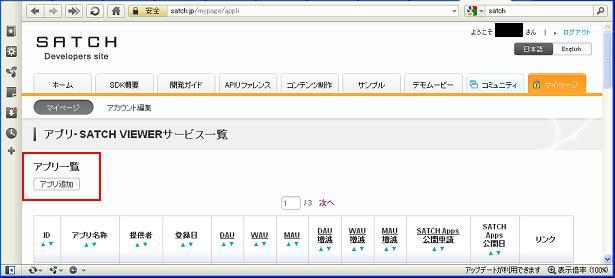
最低限、必要な項目は以下の通り。
●対象OS
Android/iOS
●アプリ名称
適当に
●公開範囲
とりあえずは非公開
●アプリアID
マイページに戻って、「コンテンツ一覧」をクリックします。

「コンテンツ追加」ボタンをクリックします。
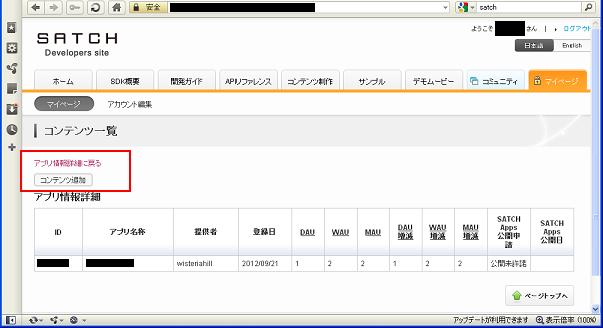
アプリ名称を確認して、コンテンツ名称を記入して、署名ファイルを選びます。
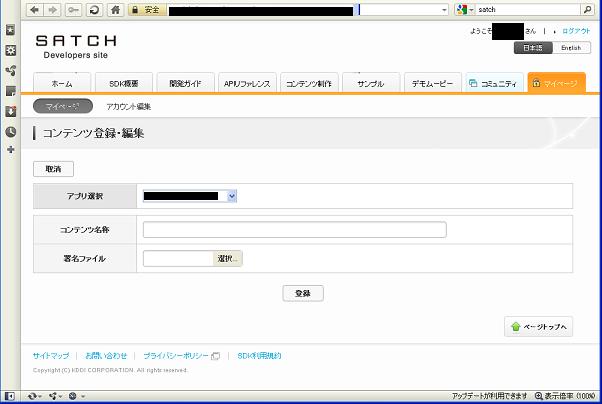
assets/Scenario/Scenario_a/Bill.dpd.dfkファイルです。
登録ボタンをクリックすると、署名ファイルのダウンロード画面が出てきます。
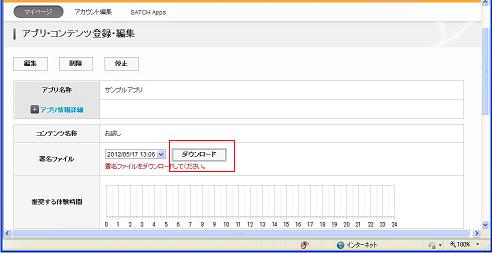
ファイルをダウンロードして、assets/Scenario/Scenario_a/Bill.dpd.dfkに上書きしてください。
以上でアプリ生成完了。
こんな、感じです。
動作確認:docomo Xperia acro
EclipseのBillプロジェクトのサンプル
ただし、Senario_aは独自に作ってApplication IDを変えておかないと、
TOP